This is how to configure Cisco AIR-CAP1702, AIR-CAP2702 as autonomous (standalone) access point. This have to be done by using another firmware image which offers web-based GUI.
What we need is:
- Console cable (one end with RJ-45 connector and the other end with RS232 serial port connector).
- Serial port on you PC
- Image file ap3g2-k9w7-tar.153-3.JH.tar – you can find link in the description of this video.
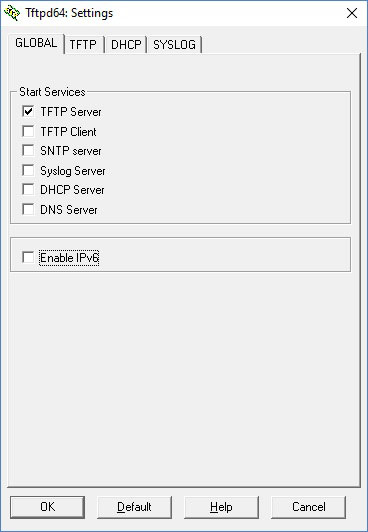
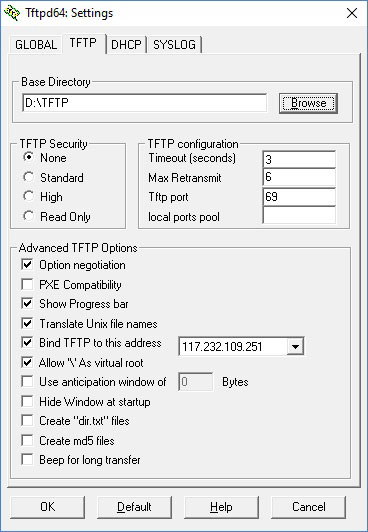
- Runing TFTP server on youtr PC with the image file shared. You can download TFTPD64 here. And here is guide how to configure it, nothing complicated.
- Some terminal emulator program, I prefer TeraTerm
- AP connected to the same network as your computer


I tested this procedure on 1702 and 2702, but i’m pretty sure that, it works well for 1700, 2700 also, with the same image file. For 1600 model line you need firmware starting with ap1g2.
The procedure
Establish the serial connection between AP and your PC, if you power AP on, some text should appear in the console.
Power AP off, press and hold MODE button, power AP on and wait for message: “button is pressed, wait for button to be released…“
Release button and now router is in image recovery mode:

Press ENTER and type ap commands:
(lines marked with // are my comments, do not type them)
//Set ip address of acces point
set IP_ADDR 10.40.1.133
set NETMASK 255.255.255.0
set DEFAULT_ROUTER 10.40.1.1
//Don't worry if you cannot ping it from PC

//Enable necessary functions
tftp_init
ether_init
flash_init

Now we erase file system by command format flash: to have enough space for new image and for clearing old configuration. It takes about minute, wait for ap: to be displayed show.
(Before that, you can look at file system by command dir flash:)
//Format file system
format flash:

Next step is downloading and extracting image file shared on your TFTP server. You have to know IP address of your, computer (in my case its’s 10.40.1.130) where TFTP server is running (dont forget enable it in firewall or disable firewall). It takes about 10 minutes.
tar -xtract tftp://10.40.1.130/ap3g2-k9w7-tar.153-3.JH.tar flash:

Now you can lok at flash: file system using dir flash: command, set new boot image and finally reboot the device.
//Let's look at the file system
dir flash:
//Set boot image
set boot flash:/ap3g2-k9w7-mx.153-3.JH
//View set parameters
set
//reboot
boot

//some models need boot setting command in this form:
//set boot flash:/ap3g2-k9w7-mx.153-3.JH/ap3g2-k9w7-mx.153-3.JH

After reboot and some time, you can see respone with current name of AP like this: NameOfAP>
Now is possible to run commands to configure. You can always pres ? to see available commands:

Set IP Address and Hostname
//Unlock configuration commands (password is Cisco)
enable

//Enter configuration mode and selecting network interface to configure
configure terminal
//select interface
interface bvi1
//setting ip address of AP
ip address 10.40.1.133 255.255.255.0
ip default-gateway 10.40.1.1
//after this, it escapes from interface, so again...
interface bvi1
no shutdown
//exit from interface
exit
//setting new hostname (name of AP)
hostname MyNewCiscoAP
//exit from configure mode
exit
write mmemory

You can check your configuration by command show ip interface brief

Set system time
//set the right clock and NTP servers
show clock
//clock set 12:32:00 21 december 2022 (optional manual setting of clock)

configure terminal
sntp server 195.113.144.201      //tik.cesnet.cz
sntp server 195.113.144.238      //tak.cesnet.cz
sntp server 217.197.91.176       //0.pool.ntp.org
sntp server 37.221.199.157       //2.pool.ntp.org
sntp broadcast client
clock timezone Prague 1          // 1 means UTC+1
exit
show clock
show sntp
//save settings
write memory
Configuration GUI
Now you should be able to ping the AP and run web GUI at http://10.40.1.133 (your adress off course). The web GUI sometimes acting strange, if you are not sure whatt exactly is happening, refresh the page.
Sometimes you have to wait until forms are filled with data.
Username and password is Cisco and Cisco

As first step, from the top menu choose Network -> (on the left panel) Network interface -> IP Address and set the Defult gateway:

You can also configure or disable IPv6 protocol at the same place.
Now follow these steps to configure and enable radios with WPA encryption
Security -> Encryption Manager -> Encryption Modes part:
-> choose Cipher
-> select AES CCMP
-> click Aply All button
Security -> SSID Manager -> SSID Properties part:
-> write SSID: (i.e. TestAP)
-> check desired radios (Radio0-802.11N 2.4GHz or Radio0-802.11AC GHz or both)
-> click Apply buttown (down)
Security -> SSID Manager:
SSID Properties part:
-> Current SSID List -> select your SSID (i.e. TestAP)
Client Authenticated Key Management part:
-> Key Management -> select Mandatory
-> check Enable WPA (or WPAv2 – sometimes it is not allowed)
-> WPA Pre-shared Key: -> write your password for SSID
-> click Apply buton within the curent part of page (there is another one down there)
Network -> Network Interface ->
-> Radio0-802.11N 2.4GHz -> Settings (on top) -> Enable Radio: -> choose Enable -> click Apply
(and the same for Radio0-802.11AC 5GHZ radio)
Security -> SSID Manager -> Guest Mode/Infrastructure SSID Settings part:
-> choose Single BSSID option
-> Set Single Guest Mode SSID: -> select yout AP name (i.e. TestAP)
(and the same for second radio)
And finaly click Save Configuration on the top right corner of the page
Now the APs’ SSID should be visible.
Xou can also store your configuration to a text file via Software -> System Configuration
Links
Here is video I followed for converting to autonomous mode
Here is the video I followed when I was configuring AP via GUI.
Cisco help page and other help page
Videoo with configuring IP – setting IP
Configure WPA2 via command line (video)
Another cisco help page
Web GUI “404 not found” error workaround (not solved – just use command line configuration instead)
Configure WPA2 via command line (video)
Some APs have broken web GUI – all Save/Aply actions are unsuccessfull, followed by 404 not found error. So it’s need to be configured via CLI.
Following comads set manualy SSID, enable WPA authentication and enable both 2.4Ghz and 5GHz radios. Type only parts after # sign.
//Setting SSID
MyNewCiscoAP#configure terminal
MyNewCiscoAP(config)#dot11 ssid YOUR_NEW_SSID
MyNewCiscoAP(config-ssid)#authentication open
MyNewCiscoAP(config-ssid)#authentication key-management wpa
MyNewCiscoAP(config-ssid)#guest-mode
MyNewCiscoAP(config-ssid)#wpa-psk ascii YOUR_WIFI_PASSWORD

//Enable 2G radio
MyNewCiscoAP(config-ssid)#interface Dot11Radio0
MyNewCiscoAP(config-if)#encryption mode ciphers aes-ccm
MyNewCiscoAP(config-if)#ssid YOUR_NEW_SSID
MyNewCiscoAP(config-if-ssid)#no shut

//Enable 5G radio
MyNewCiscoAP(config-ssid)#interface Dot11Radio1
MyNewCiscoAP(config-if)#encryption mode ciphers aes-ccm
MyNewCiscoAP(config-if)#ssid YOUR_NEW_SSID
MyNewCiscoAP(config-if-ssid)#no shut

//Save config
MyNewCiscoAP(config-if-ssid)#exit
MyNewCiscoAP(config-if)exit
MyNewCiscoAP#write memory

//reboot
MyNewCiscoAP#reload
Here is the source (for note only):
//here is the source
//https://www.hjgode.de/wp/2015/11/10/how-to-enable-wpa2-psk-aes-on-cisco-ap1231g/
---------------------------------
The normal documented way to enable WPA2-PSK is:

configure terminal
dot11 ssid <SSID_NAME>
authentication open
authentication key-management wpa version 2
guest-mode
wpa-psk ascii <SSID_PASSWORD>
!
interface Dot11Radio0
encryption mode ciphers aes-ccm
ssid <SSID_NAME>
no shutdown
!
Every time I got an error entering this line:

AP1(config-ssid)#authentication key-management wpa version 2
                                                    ^
% Invalid input detected at '^' marker.
The trick is to ignore the “version 2”. The software will automatically use WPA2 when you enter “aes-ccm” as the encryption mode cipher. So instead of the above use the following config commands:

configure terminal
dot11 ssid <SSID_NAME>
authentication open
authentication key-management wpa
guest-mode
wpa-psk ascii <SSID_PASSWORD>
!
interface Dot11Radio0
encryption mode ciphers aes-ccm
ssid <SSID_NAME>
no shutdown
!
Thanks to Cisco not mentioning that in there standard documenation and thanks for one or two guys pointing that out in internet.
404 discussion
404 certificate workaround
crypto key generate rsa general-keys

AP# configure terminal
AP(config)# hostname ap3600
AP(config)# ip domain name company.com
AP(config)# ip name-server 10.91.107.18
AP(config)# ip http secure-server
AP(config)# end
3PO_AP#configure terminal
Enter configuration commands, one per line.  End with CNTL/Z.
3PO_AP(config)#ip http server
3PO_AP(config)#crypto pki server IOS-CA
3PO_AP(cs-server)#grant auto
3PO_AP(cs-server)#database level complete
3PO_AP(cs-server)#o shut
                  ^
% Invalid input detected at '^' marker.

3PO_AP(cs-server)#no shut
%Some server settings cannot be changed after CA certificate generation.
% Please enter a passphrase to protect the private key
% or type Return to exit
Password:

Re-enter password:
% Password do not match - Aborted

3PO_AP(cs-server)#no shut
%Some server settings cannot be changed after CA certificate generation.
% Please enter a passphrase to protect the private key
% or type Return to exit
Password:

Re-enter password:
% Generating 1024 bit RSA keys, keys will be non-exportable...
[OK] (elapsed time was 1 seconds)

% Certificate Server enabled.
3PO_AP(cs-server)#show crypto pki server IOS-CA Certificates
                       ^
% Invalid input detected at '^' marker.

3PO_AP(cs-server)#show crypto pki server IOS-CA Certificates
                       ^
% Invalid input detected at '^' marker.

3PO_AP(cs-server)#exit
3PO_AP(config)#exit
3PO_AP#show crypto pki server IOS-CA Certificates
Serial Issued date              Expire date               Subject Name
1       12:55:22 UTC Dec 21 2022 12:55:22 UTC Dec 20 2025  cn=IOS-CA

3PO_AP#configure terminal
Enter configuration commands, one per line.  End with CNTL/Z.
3PO_AP(config)#ip domain name strabag.cz
3PO_AP(config)#ip name server 8.8.8.8
                       ^
% Invalid input detected at '^' marker.

3PO_AP(config)#ip name-server 8.8.8.8
3PO_AP(config)#ip http secure-server
3PO_AP(config)#end
3PO_AP#show crypto pki server IOS-CA Certificates
Serial Issued date              Expire date               Subject Name
1       12:55:22 UTC Dec 21 2022 12:55:22 UTC Dec 20 2025  cn=IOS-CA

3PO_AP#crypto pki authenticate
                  ^
% Invalid input detected at '^' marker.

3PO_AP#config term
Enter configuration commands, one per line.  End with CNTL/Z.
3PO_AP(config)#crypto pki authenticate
% Incomplete command.

3PO_AP(config)#crypto pki authenticate ?
  WORD  CA Server Name

3PO_AP(config)#crypto pki authenticate IOS-CA
% Please delete your existing CA certificate first.
% You must use 'no crypto pki trustpoint <trustpoint-name>' to delete the CA certificate.
3PO_AP(config)#crypto pki trustpoint TEST
3PO_AP(ca-trustpoint)#enrollment url http://192.168.100.5:80
3PO_AP(ca-trustpoint)#subject-name CN=TEST
3PO_AP(ca-trustpoint)#revocation-check none
3PO_AP(ca-trustpoint)#rsakeypair TEST
3PO_AP(ca-trustpoint)#exit
3PO_AP(config)#crypto pki auth TEST
3PO_AP(config)#crypto pki auth TEST
Certificate has the following attributes:
       Fingerprint MD5: 55E5D63C F583C887 78781D6A F9501CE7
      Fingerprint SHA1: 4E6D9099 4D45FAC3 B3175939 30EA4508 574F1422

% Do you accept this certificate? [yes/no]: y
Trustpoint CA certificate accepted.
3PO_AP(config)#crypto pki enroll TEST
%
% Start certificate enrollment ..
% Create a challenge password. You will need to verbally provide this
   password to the CA Administrator in order to revoke your certificate.
   For security reasons your password will not be saved in the configuration.
   Please make a note of it.

Password:
Re-enter password:

% The subject name in the certificate will include: CN=TEST
% The subject name in the certificate will include: 3PO_AP.strabag.cz
% Include the router serial number in the subject name? [yes/no]: yes
% The serial number in the certificate will be: FCW1903N2B1
% Include an IP address in the subject name? [no]: no
Request certificate from CA? [yes/no]: yes
% Certificate request sent to Certificate Authority
% The 'show crypto pki certificate verbose TEST' commandwill show the fingerprint.

3PO_AP(config)#show crypto pki certificate verbose TEST
                 ^
% Invalid input detected at '^' marker.

3PO_AP(config)#exit
3PO_AP#show crypto pki certificate verbose TEST
Certificate
  Status: Available
  Version: 3
  Certificate Serial Number (hex): 02
  Certificate Usage: General Purpose
  Issuer:
    cn=IOS-CA
  Subject:
    Name: 3PO_AP.strabag.cz
    Serial Number: FCW1903N2B1
    serialNumber=FCW1903N2B1+hostname=3PO_AP.strabag.cz
    cn=TEST
  Validity Date:
    start date: 13:07:48 UTC Dec 21 2022
    end   date: 13:07:48 UTC Dec 21 2023
  Subject Key Info:
    Public Key Algorithm: rsaEncryption
    RSA Public Key: (512 bit)
  Signature Algorithm: SHA1 with RSA Encryption
  Fingerprint MD5: 75744E01 3CB87745 2B6B1EEE 3B910E56
  Fingerprint SHA1: 2D2E158C 0D4E0D3C 06BED720 96012CF9 CB9D736A
  X509v3 extensions:
    X509v3 Key Usage: A0000000
      Digital Signature
      Key Encipherment
    X509v3 Subject Key ID: AD9F0B7F D975484D 8C57FD71 0EF14E31 F89D64BE

    X509v3 Authority Key ID: 0A3B4200 022FE4F4 011DFAE6 DA39E288 9ACB50D2
    Authority Info Access:
  Associated Trustpoints: TEST
  Key Label: TEST

CA Certificate
  Status: Available
  Version: 3
  Certificate Serial Number (hex): 01
  Certificate Usage: Signature
  Issuer:
    cn=IOS-CA
  Subject:
    cn=IOS-CA
  Validity Date:
    start date: 12:55:22 UTC Dec 21 2022
    end   date: 12:55:22 UTC Dec 20 2025
  Subject Key Info:
    Public Key Algorithm: rsaEncryption
    RSA Public Key: (1024 bit)
  Signature Algorithm: MD5 with RSA Encryption
  Fingerprint MD5: 55E5D63C F583C887 78781D6A F9501CE7
  Fingerprint SHA1: 4E6D9099 4D45FAC3 B3175939 30EA4508 574F1422
  X509v3 extensions:
    X509v3 Key Usage: 86000000
      Digital Signature
      Key Cert Sign
      CRL Signature
    X509v3 Subject Key ID: 0A3B4200 022FE4F4 011DFAE6 DA39E288 9ACB50D2
    X509v3 Basic Constraints:
        CA: TRUE

    X509v3 Authority Key ID: 0A3B4200 022FE4F4 011DFAE6 DA39E288 9ACB50D2
    Authority Info Access:
  Associated Trustpoints: TEST IOS-CA


3PO_AP#write memory
Building configuration...
[OK]
3PO_AP#cofig term
         ^
% Invalid input detected at '^' marker.

3PO_AP#config term
Enter configuration commands, one per line.  End with CNTL/Z.
3PO_AP(config)#ip domain name 192.168.100.5
% IP: Bad domain name format - Configuring anyway
3PO_AP(config)#ip http secure-server
3PO_AP(config)#no shut
                    ^
% Invalid input detected at '^' marker.

3PO_AP(config)#exit
3PO_AP#show clock
13:11:29.207 UTC Wed Dec 21 2022
3PO_AP#clock timezone ?
% Unrecognized command
3PO_AP#configure term
Enter configuration commands, one per line.  End with CNTL/Z.
3PO_AP(config)#clock ?
  initialize   Initialize system clock on restart
  save         backup of clock with NVRAM
  summer-time  Configure summer (daylight savings) time
  timezone     Configure time zone

3PO_AP(config)#clock timezone ?
  WORD  name of time zone

3PO_AP(config)#clock timezone prague
% Incomplete command.

3PO_AP(config)#clock timezone prague ?
  <-23 - 23>  Hours offset from UTC

3PO_AP(config)#clock timezone prague 1
3PO_AP(config)#clock timezone praguggg
% Incomplete command.

3PO_AP(config)#clock timezone praguggg 1
%Time zone name is limited to 7 characters

3PO_AP(config)#clock timezone sdg 1
3PO_AP(config)#clock timezone sdg 1
3PO_AP#show clock
14:17:52.144 sdg Wed Dec 21 2022
3PO_AP#config term
Enter configuration commands, one per line.  End with CNTL/Z.
3PO_AP(config)#clock timezone Prague 1
3PO_AP(config)#exit
3PO_AP#show clock
14:18:24.639 Prague Wed Dec 21 2022
3PO_AP#show clock ?
  detail  Display detailed information
  |       Output modifiers
  <cr>

3PO_AP#show clock timezone
                  ^
% Invalid input detected at '^' marker.

3PO_AP#show clock ?
  detail  Display detailed information
  |       Output modifiers
  <cr>

3PO_AP#show clock detail
14:18:49.382 Prague Wed Dec 21 2022
Time source is SNTP
3PO_AP#config term
Enter configuration commands, one per line.  End with CNTL/Z.
3PO_AP(config)#crypto key generate rsa general-keys
The name for the keys will be: 3PO_AP.192.168.100.5
Choose the size of the key modulus in the range of 360 to 4096 for your
  General Purpose Keys. Choosing a key modulus greater than 512 may take
  a few minutes.

How many bits in the modulus [512]: 1024
% Generating 1024 bit RSA keys, keys will be non-exportable...
[OK] (elapsed time was 1 seconds)

3PO_AP(config)#ca generate rsa key 1024


